使用WireGuard转发内网网段
之前打强网杯线下赛,只穿了个socks代理以至于二进制的同学不能接入网络。于是便使用 iptables + wg-easy 来实现一个内网穿透
OK,开始正题。现在需要支持在外面远程访问内网,可以实现类似内网访问的操作以支持二进制解题的网络需求
WireGuard
WireGuard是一种快速、现代的虚拟私人网络(VPN)协议。相对于其他VPN协议,WireGuard更加轻量级且易于配置和管理。它可以在多种操作系统上运行,包括Linux、Windows、macOS、iOS和Android。
WireGuard协议采用了最新的加密技术,比如Curve25519椭圆曲线加密和ChaCha20加密算法。它的数据包头部非常小,只有80字节,这使得它在传输数据时的开销非常小,因此它在延迟和吞吐量上的表现非常出色。与其他VPN协议相比,WireGuard的连接速度更快、更可靠、更稳定,并且在重连时也能够自动恢复连接。
总的来说,WireGuard是一种安全、高效、简单易用的VPN协议,因此它在当前的VPN市场上越来越受到青睐。
以下是WireGuard的性能对比

wg-easy 可以让我们在任何 Linux 主机上更加方便地安装和管理 WireGuard,项目地址:https://github.com/WeeJeWel/wg-easy
优点:快速部署,配置文件的快速下发,方便管理,docker部署对云服务器不会产生影响
网络拓扑图
话不多说,开始安装吧。网络拓扑大致如下。
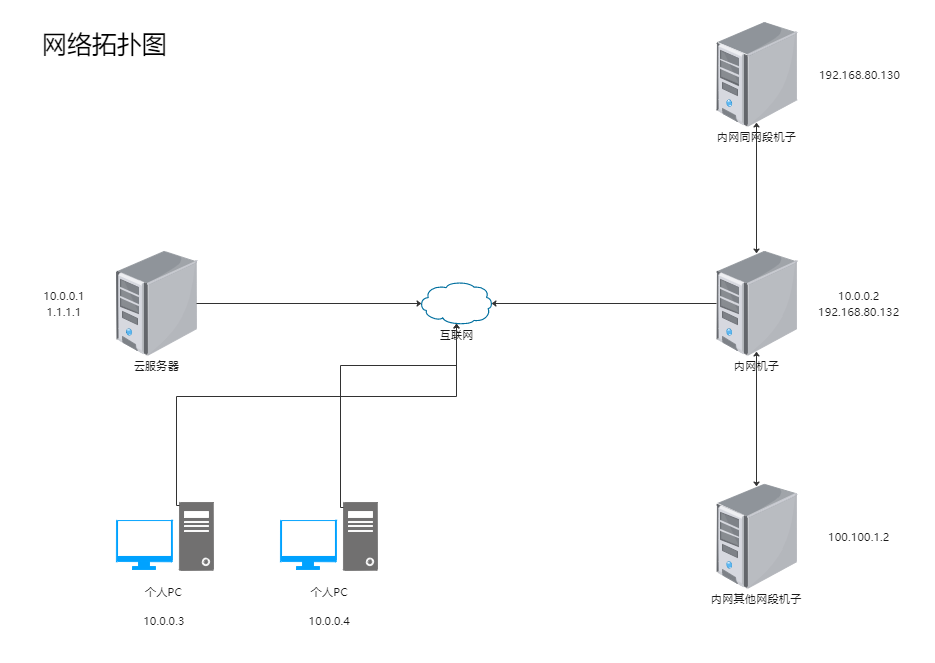
其中:
1.1.1.1 为服务器的公网 IP192.168.80.0/24 为内网的 IP 段10.0.0.0/24 为 WireGuard 的 VPN 内网网段100.100.1.0/24 为内网其他网段的 IP 段
最终实现的效果是,互联网上的其他主机通过连接 1.1.1.1 上的 VPN 服务,接入内网机子网段。
即:个人PC可以访问到100.100.1.2,192.168.80.130等等
安装 WireGuard
需要在 个人PC 和 内网机子(此处IP为 10.0.0.2) 上安装,其他不需要安装WireGuard
https://www.wireguard.com/install/
WireGuard 不区分服务端与客户端,安装也比较简单,不出意外的话可以一行命令直接安装。
部署 wg-easy
原本的wg-easy的流量出口为云服务器,我对其进行了一定的魔改使得流量出口(指定IP段的流量)为内网机子
1
| git clone https://github.com/L1aovo/my-wg-easy.git
|
修改 docker-compose.dev.yml 补全 environment 部分
1
2
3
4
5
6
7
8
9
10
11
12
13
14
15
16
17
18
19
20
21
22
23
24
25
26
27
28
| version: "3.8"
services:
wg-easy:
image: weejewel/wg-easy
command: sh -c "cd /;npm install basic-auth;cd /app;npm run serve"
volumes:
- ./src/:/app/
- ./conf:/etc/wireguard
ports:
- "51820:51820/udp"
- "51821:51821/tcp"
environment:
- WG_HOST=
- PASSWORD=
- WG_ALLOWED_IPS=192.168.80.0/24, 10.0.0.0/24, 100.100.1.0/24
- WG_DEFAULT_ADDRESS=10.0.0.x
- WG_DEFAULT_DNS=8.8.8.8
- WG_LOCAL_PASS=192.168.80.132
- WG_PERSISTENT_KEEPALIVE=25
- WG_LOCAL_NAME=l1aotest
cap_add:
- NET_ADMIN
- SYS_MODULE
sysctls:
- net.ipv4.ip_forward=1
- net.ipv4.conf.all.src_valid_mark=1
|
1
| docker-compose -f docker-compose.dev.yml up
|
- web端下发配置,首先创建一个 WG_LOCAL_NAME 配置,并下载到内网机子上(web端验证为 rois:l1ao,wg-easy登陆为PASSWORD你设置的)
- 在内网机子上打开IP转发:编辑
/etc/sysctl.conf, 将 net.ipv4.ip_forward = 0 中的 0 改为 1。然后 sysctl -p 使其生效。
- 内网机子必须是linux主机,windows做转发会有很多bug,执行命令
sudo wg-quick up 配置文件的绝对路径
- 测试 ping 云服务器 10.0.0.1 不成功的话重启 云服务器的wireguard服务 再重启内网机子的 wireguard,测试ping,能ping通则可以进行内网转发了
- web端下发配置,创建个人PC的配置,并下载到个人PC上,启动vpn
- 访问内网服务
示例配置
10.0.0.1云服务器的配置
1
2
3
4
5
6
7
8
9
10
11
12
13
14
15
16
17
18
19
20
21
22
23
24
25
26
27
28
29
30
31
32
33
34
| # Note: Do not edit this file directly.
# Your changes will be overwritten!
# Server
[Interface]
PrivateKey =
Address = 10.0.0.1/24
ListenPort = 51820
PreUp =
Postup = iptables -A INPUT -p tcp -m tcp --dport 51821 -j ACCEPT;
PostUp = iptables -A INPUT -p udp -m udp --dport 51820 -j ACCEPT; iptables -A FORWARD -i wg0 -j ACCEPT; iptables -A FORWARD -o wg0 -j ACCEPT;
PostUp = iptables -I FORWARD -s 10.0.0.0/24 -i wg0 -d 10.0.0.0/24 -j ACCEPT
PostUp = iptables -I FORWARD -s 10.0.0.0/24 -i wg0 -d 0.0.0.0/0 -j ACCEPT
PostUp = iptables -I FORWARD -s 0.0.0.0/0 -i wg0 -d 10.0.0.0/24 -j ACCEPT
PreDown =
Postup = iptables -D INPUT -p tcp -m tcp --dport 51821 -j ACCEPT;
PostDown = iptables -D INPUT -p udp -m udp --dport 51820 -j ACCEPT; iptables -D FORWARD -i wg0 -j ACCEPT; iptables -D FORWARD -o wg0 -j ACCEPT;
PostDown = iptables -D FORWARD -s 10.0.0.0/24 -i wg0 -d 10.0.0.0/24 -j ACCEPT
PostDown = iptables -D FORWARD -s 10.0.0.0/24 -i wg0 -d 0.0.0.0/0 -j ACCEPT
PostDown = iptables -D FORWARD -s 0.0.0.0/0 -i wg0 -d 10.0.0.0/24 -j ACCEPT
# Client: l1aotest (xxxxxxxx-xxxx-xxxx-xxxx-xxxxxxxxxxxx)
[Peer]
PublicKey =
PresharedKey =
AllowedIPs = 10.0.0.2/32, 192.168.80.0/24, 10.0.0.0/24, 100.100.1.0/24
# Client: l1ao's iphone (xxxxxxxx-xxxx-xxxx-xxxx-xxxxxxxxxxxx)
[Peer]
PublicKey =
PresharedKey =
AllowedIPs = 10.0.0.3/32
|
10.0.0.2内网机子的配置
1
2
3
4
5
6
7
8
9
10
11
12
13
14
| [Interface]
PrivateKey =
Address = 10.0.0.2/24
PostUp = iptables -t nat -A POSTROUTING -s 10.0.0.0/24 -j SNAT --to-source 192.168.80.132
PostDown = iptables -t nat -D POSTROUTING -s 10.0.0.0/24 -j SNAT --to-source 192.168.80.132
DNS = 8.8.8.8
[Peer]
PublicKey =
PresharedKey =
AllowedIPs = 10.0.0.0/24
PersistentKeepalive = 25
Endpoint = WG_HOST:51820
|
个人PC的配置
1
2
3
4
5
6
7
8
9
10
11
| [Interface]
PrivateKey =
Address = 10.0.0.3/24
DNS = 8.8.8.8
[Peer]
PublicKey =
PresharedKey =
AllowedIPs = 192.168.80.0/24, 10.0.0.0/24, 100.100.1.0/24
PersistentKeepalive = 25
Endpoint = WG_HOST:51820
|
参考